Appointure is an appointment booking plugin for WordPress. Visitors pick a service, a date and a time, enter their details and get a confirmation. You manage services, staff, hours, payments and bookings from one Appointments menu in wp-admin. The screenshots below come from our demo site, so your names and services will differ.
Requirements
- WordPress 6.0 or newer and PHP 8.0 or newer. Single sites and multisite networks both work.
- Only for the features that use them: a Stripe account for payments, a Google Cloud OAuth client for Google Calendar and Meet, a Zoom Server-to-Server OAuth app for Zoom links, and a Twilio account for texts.
Install and activate
- Download the ZIP from My Licences, then go to Plugins → Add New → Upload Plugin and upload it.
- Click Activate. Appointure creates its database tables and adds an Appointments menu with Appointments, Services, Availability, Staff, Coupons and Settings.
- Paste your licence key under Appointments → Settings → License so the site receives updates.
There’s no build step and nothing to install with Composer or npm. It works as soon as it’s active.
Set it up in this order
- Add at least one service. This is what visitors book.
- Set your weekly hours under Availability.
- If more than one person takes bookings, turn on multi-provider mode and add staff.
- Create a booking page with the
[appointure_booking_widget]shortcode and select it in the settings. - Optionally add a services page and a manage booking page.
- Check the notification settings, then set up payments, calendar sync, meetings or texts if you want them.
If Book Now ever opens a blank page, the Booking Page setting points at a page that doesn’t contain the booking widget shortcode.
Services
A service is anything a visitor can book: a consultation, a call, a lesson. Appointments → Services lists each one with its length, price and deposit, a shortcode to copy and its status.

Click Add Service, or Edit on an existing one. These are the fields that decide when it can be booked:
- Duration: how long the appointment lasts, in minutes.
- Slot interval: how often start times are offered. A 60-minute service with a 30-minute interval can start on the hour or the half hour.
- Buffer before and after: minutes kept free around each booking, so appointments never run back to back.
- Minimum notice: in minutes. 120 means nobody can book anything in the next two hours.
- Maximum advance: how many days ahead people can book.
- Location type: in person, phone, custom, Google Meet or Zoom. Meet needs the Google Calendar connection and Zoom needs the Integrations tab.
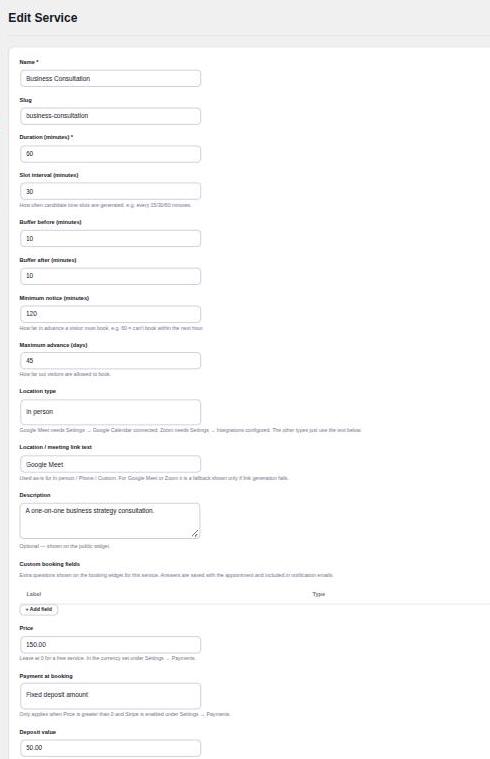
Below those are the description shown on the services grid, custom booking fields (extra questions with a label, a type and a Required switch, whose answers are saved with the booking and included in emails), the price, and Payment at booking. That can be none, full payment online, a fixed deposit or a percentage deposit. Online payment only applies once Stripe is set up. A price of 0 makes the service free. The image and Color tag change how the service looks on the grid and the calendar, and inactive services are hidden but keep their history.
Staff and multi-provider mode
By default there’s one shared schedule for the whole business. If several people take bookings, tick Enable multi-provider mode under Settings → General. Each staff member then gets their own hours and assigned services.

For each person, enter a name and the email that should receive their booking notifications, optionally link a WordPress user and a photo, and tick the services they take. A service with one assigned person books that person automatically.
When a service has two or more staff, the booking widget offers Any available staff by default. Appointure then books whoever is free at the chosen time with the fewest upcoming bookings. Customers can still pick a specific person. If multi-provider mode is on and a service has nobody assigned, visitors see “No staff members are available for this service”.
Availability
Go to Appointments → Availability. In multi-provider mode there’s a tab for each staff member.

Weekly Hours: add one row per open time range. A day with no rows is closed. For a lunch break, add two rows on the same day, such as 09:00 to 13:00 and 14:00 to 17:00, then click Save Weekly Hours.
Date-Specific Overrides: mark a single date Closed for a holiday, or Open with extra hours for a one-off Saturday, without changing the weekly pattern.
Hours are read in your site’s timezone (Settings → General in WordPress). Visitors see slot times in their own timezone.
The booking page and services grid
Create a page, add [appointure_booking_widget] on its own with no service ID, and select it under Settings → General → Booking Page. Every Book Now button sends visitors there with the service already chosen. To fix a page to one service, use [appointure_booking_widget service_id="2"]. The widget is also available as the Appointure Booking Widget block.
For a page that lists every service, add [appointure_services_grid]. It takes optional columns="1" to "4", title="..." and booking_page="URL or page ID".

The widget runs in three steps. The customer picks a date and a time, then enters their name, email, your custom fields, a phone number if texts are on and a discount code, then sees a confirmation with an Add to calendar link. A service that takes payment stays pending until Stripe confirms it.


The CSS and JavaScript only load on pages that use the shortcode or block.
Managing appointments
Appointments → Appointments lists every booking. Free bookings are confirmed as soon as the slot is checked. Bookings that need payment stay pending until Stripe confirms them.

Filter by status, service, staff member, a date range or a customer’s name or email. A pending booking can be confirmed or cancelled. A confirmed one can be marked completed, marked no-show or cancelled. Completed, cancelled and no-show are final, and paid bookings can be refunded in full or in part from the same row. Cancelling also removes the Google Calendar event.
The Calendar tab shows a month grid with each booking in its service’s colour, and “+N more” on busy days.

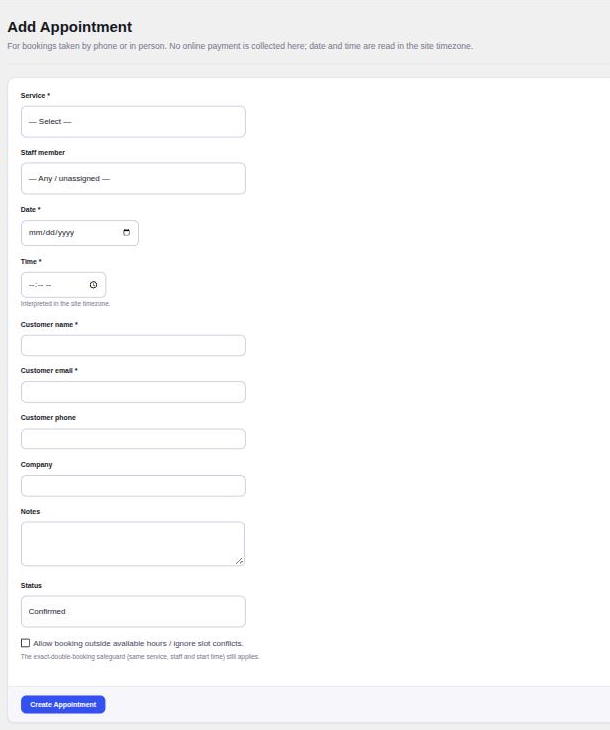
For phone or walk-in bookings, click + Add Appointment, choose the service, a staff member or none, the date and time, and enter the customer’s name and email. The status starts as Confirmed. Tick Allow booking outside available hours to override the schedule. No payment is taken on this form, and the same service, staff member and start time still can’t be booked twice.
Coupons
Appointments → Coupons holds discount codes. A coupon reduces the amount taken at booking, so it does nothing on free services or services paid in person.
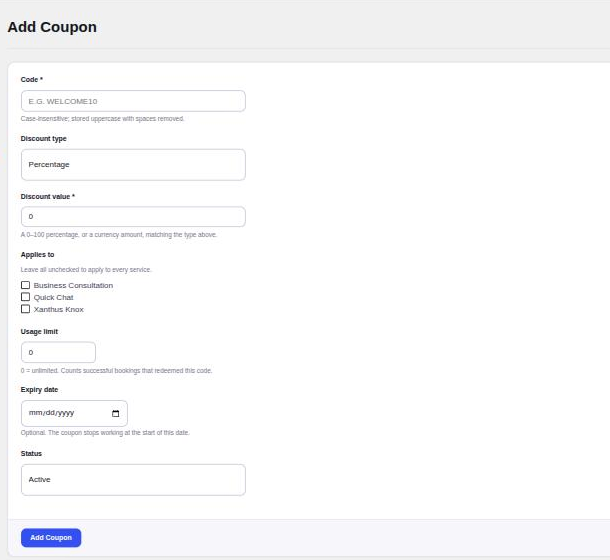
Codes are case-insensitive and stored in capitals without spaces. Choose a percentage or a fixed amount, tick services to limit it (leave them all unticked for every service), set a usage limit (0 is unlimited, and only successful bookings count) and an optional expiry date. The coupon stops working at the start of that date. Customers type the code into the Discount code box and click Apply.
Notifications and email
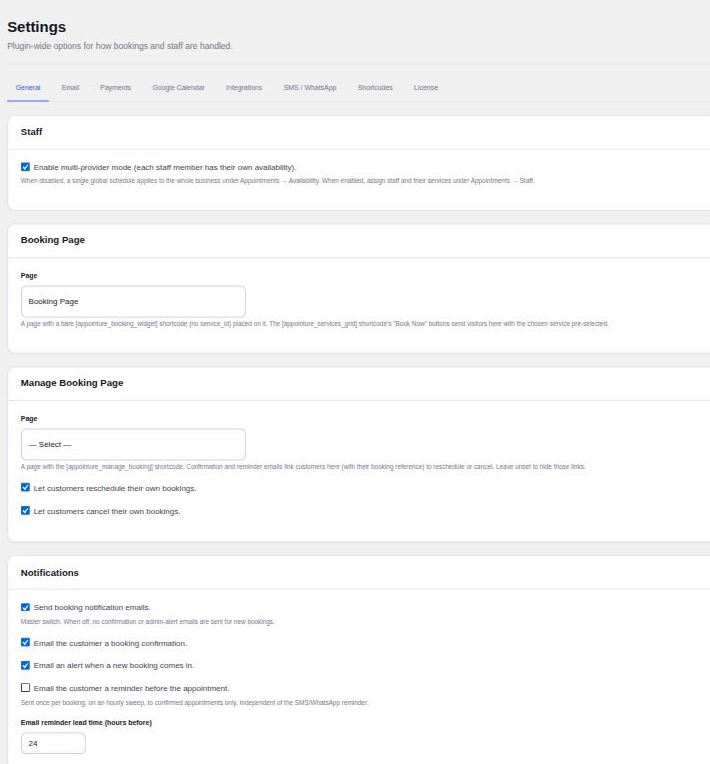
Under Settings → General → Notifications there’s a master switch for booking emails, plus the customer confirmation, the admin alert and an optional reminder email with its lead time in hours (24 by default). Reminders go once per booking to confirmed appointments, checked every hour. Emails carry an .ics calendar attachment.
Mail goes through your site’s normal WordPress mail. If messages aren’t arriving, tick Send mail through a custom SMTP server under Settings → Email and enter your host, port, encryption, username and password. Every send is logged.
Payments with Stripe
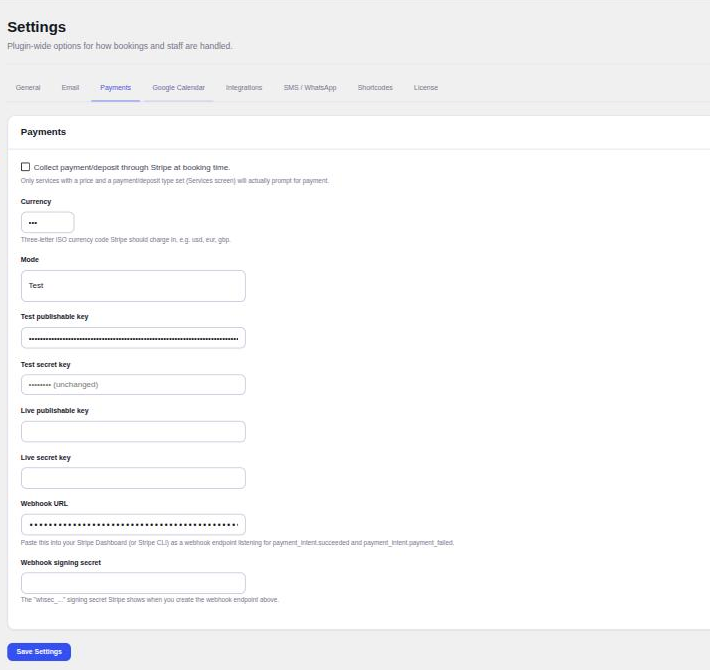
- Tick Collect payment/deposit through Stripe at booking time.
- Set the currency as a three-letter code, such as gbp or usd, and the mode, Test or Live.
- Paste the publishable and secret keys for that mode. Saved secret keys show as “(unchanged)”.
- Copy the webhook URL into your Stripe Dashboard as an endpoint for
payment_intent.succeededandpayment_intent.payment_failed, then paste the signing secret (it starts with whsec_) back here.
A booking that needs payment stays pending until Stripe confirms it, and unpaid pending bookings are cancelled after a timeout so an abandoned checkout doesn’t hold the slot. Zero-decimal currencies work too.
Google Calendar and Google Meet
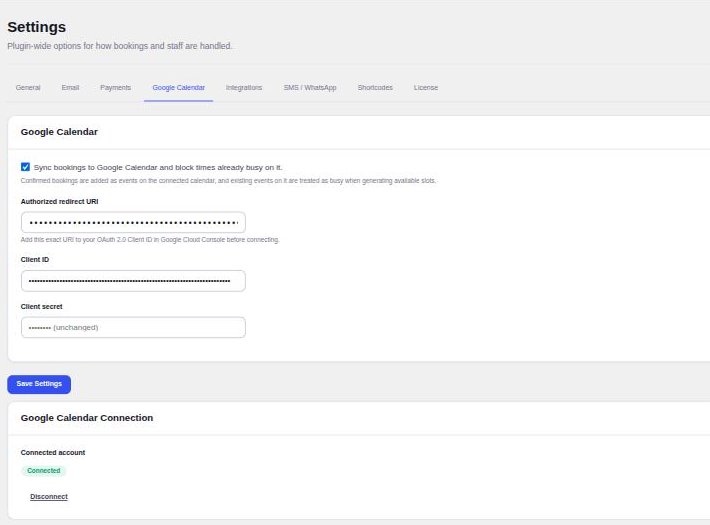
- Create an OAuth client in Google Cloud Console, enter its Client ID and Client secret, and add the Authorized redirect URI shown on this screen to that client.
- Save, then connect your Google account. The status shows under Google Calendar Connection.
Confirmed bookings are added to the connected calendar, existing events on it block those times, and cancelling a booking deletes its event. One Google account is connected per site, not per staff member. For Meet links, set a service’s location type to Google Meet. Nothing else needs setting up.
Zoom
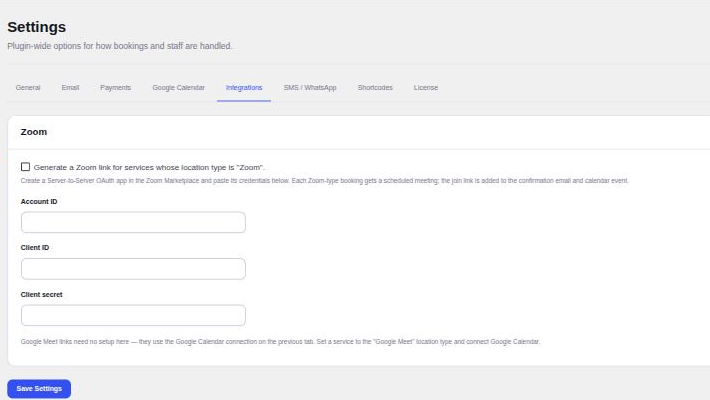
Create a Server-to-Server OAuth app in the Zoom Marketplace and paste its Account ID, Client ID and Client secret under Settings → Integrations. Every booking for a service whose location type is Zoom then gets a scheduled meeting, and the join link goes into the confirmation email and calendar event.
SMS and WhatsApp reminders
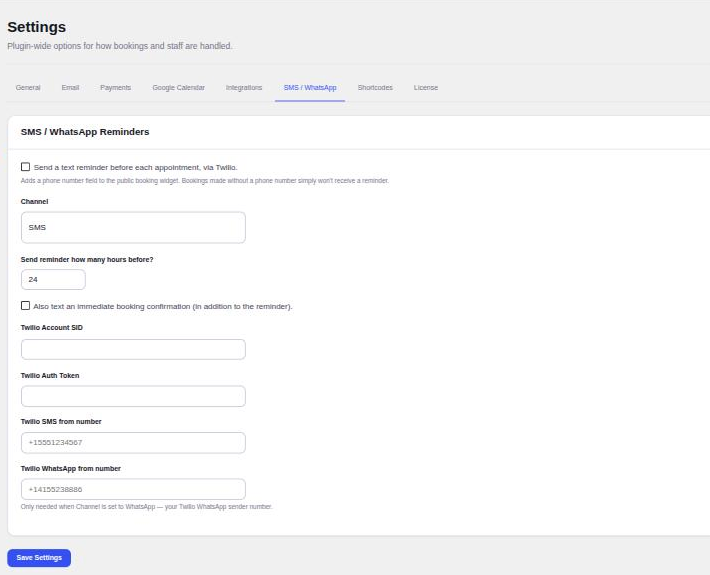
Tick Send a text reminder before each appointment, via Twilio. That adds an optional phone field to the booking form. Choose SMS or WhatsApp and how many hours before to send, optionally tick the immediate booking confirmation text, and enter your Twilio Account SID, Auth Token and sender number. Bookings without a phone number are skipped, and every attempt is logged.
Letting customers reschedule or cancel
- Create a page with the
[appointure_manage_booking]shortcode. - Select it under Settings → General → Manage Booking Page.
- Tick Let customers reschedule their own bookings, Let customers cancel their own bookings, or both.
Confirmation and reminder emails then link to that page with the customer’s booking reference. The reference is the only credential, so the link should stay in the customer’s inbox. With no page selected, the links aren’t shown.
My Bookings for logged-in customers
Customers with an account on your site get a My Bookings screen. It lists their upcoming appointments, soonest first, and their past appointments a page at a time. Bookings are matched by account and by the account’s email address, so appointments made before the customer registered appear too.
Each upcoming booking has buttons to join the meeting, reschedule, cancel or add it to a calendar. Rescheduling and cancelling follow the same two switches as the Manage Booking page, and there’s a button to book another appointment. Settings → Shortcodes lists the shortcode for this screen, along with the other three.
Multisite
On a WordPress multisite network, each subsite keeps its own services, staff, hours and bookings. The licence is shared across the network: enter it once as a network (super) admin, and each subsite running Appointure counts as one site against its limit. Adding, activating, deactivating or deleting a subsite updates the activations automatically. Deleting the plugin removes the data from every subsite and the network-wide licence data.
Troubleshooting
| Problem | What to check |
|---|---|
| No time slots appear | Add weekly hours, then check the service’s minimum notice and maximum advance. In multi-provider mode, assign staff to the service. |
| A paid booking stays pending | Check the Stripe webhook URL and signing secret. |
| Calendar events don’t block times | Make sure Google Calendar shows Connected. |
| No Zoom link in the email | The service’s location type must be Zoom, with valid credentials on the Integrations tab. |
| No reminder emails or texts | Reminders only go to confirmed bookings, on an hourly check. Texts need the customer’s phone number. |
| Customers can’t reschedule or cancel | Select a Manage Booking Page and tick its permission boxes. |
| Emails aren’t arriving | Turn on custom SMTP and look at the email log. |
Deactivating versus deleting
Deactivating keeps all your data. Deleting Appointure from the Plugins screen removes its tables and every setting, including licence data and the Google Calendar connection. That can’t be undone, so export anything you need first.